String 객체
const str1 = 'JavaScript';
const str2 = new String('JavaScript');
str1 == str2; // true
str1 === str2; // false
<!DOCTYPE html>
<html lang="en">
<head>
    <meta charset="UTF-8">
    <meta name="viewport" content="width=device-width, initial-scale=1.0">
    <title>String 객체</title>
</head>
<body>
    <h2>String 객체</h2>
    <script>
        const str1 = '안녕하세요. JavaScript';
        const str2 = new String('안녕하세요. JavaScript');

        console.log(str1 == str2);
        console.log(str1 === str2);
        console.log(typeof(str1));
        console.log(typeof(str2));

        // length: 문자열의 길이를 반환
        console.log(str1.length);

        // indexOf() : 특정 문자나 문자열이 처음으로 등장하는 위치를 인덱스로 반환
        console.log(str1.indexOf('J'));
        console.log(str1.indexOf('Java'));
        console.log(str1.indexOf('java')); // -1
        console.log(str1.indexOf('a'));
        console.log(str1.lastIndexOf('a'));

        // charAt(): 특정 문자열에서 전달 받은 인덱스에 위치한 문자를 반환
        console.log(str1.charAt(7));

        // includes(): 특정 문자열에서 전달 받은 문자열이 포함되어 있는지 여부를 반환
        console.log(str1.includes('Java'));
        console.log(str1.includes('java'));

        // substring(): 전달 받은 시작 인덱스부터 종료 인덱스 직전까지의 문자열을 추출
        console.log(str1.substring(7));
        console.log(str1.substring(7, 11));

        // replace() : 원본 문자열의 일부를 전달 받은 문자열로 치환
        console.log(str1.replace('안녕하세요.', 'Hello'));

        // split() : 구분자를 기준으로 나눈 후 나뉜 문자열을 하나의 배열에 저장
        const str3 = '김사과,오렌지,반하나,이메론,배애리,채리';
        const students = str3.split(',');
        console.log(students);

        for(let i in students){
            console.log(i, students[i]);
        }
        console.log('---------');

        // trim(): 문자열의 앞 뒤 공백을 제거
        const str4 = '          JavaScript          '
        console.log(`😎${str4}😎`);
        console.log(`😎${str4.trim()}😎`)

        // toUpperCase(), toLowerCase: 문자열을 모두 대, 소문자로 변환
        console.log(`😎${str4.trim().toUpperCase()}😎`)
        console.log(`😎${str4.trim().toLowerCase()}😎`)
    </script>
</body>
</html>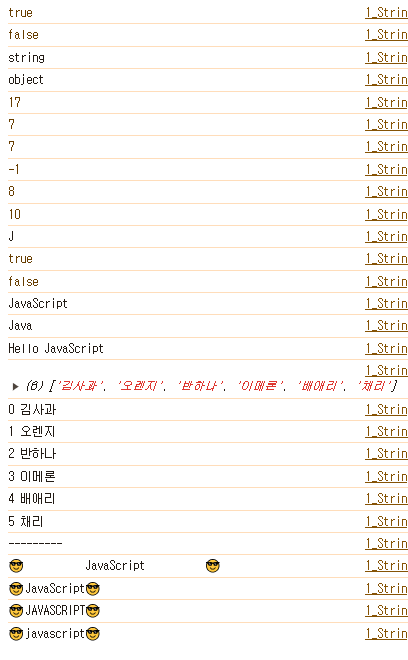
Date 객체
날짜, 시간 등을 쉽게 처리할 수 있는 내장 객체
const 변수명 = new Date(); // 현재 날짜 시간
const 변수명 = new Date(년, 월, 일, 시, 분, 초, 밀리초); // 입력한 날짜 시간에 대한 객체
연도(year)
2자리로 표기
예) 23 -> 1923년
4자리로 표기
예) 2024 -> 2024년
월(month)
0 ~ 11
예) 0 -> 1월, 11월 -> 12월
<!DOCTYPE html>
<html lang="en">
<head>
    <meta charset="UTF-8">
    <meta name="viewport" content="width=device-width, initial-scale=1.0">
    <title>Date 객체</title>
</head>
<body>
    <h2>Date 객체</h2>
    <script>
        console.log(new Date());
        console.log(new Date(24, 10, 11)); // 1924, 11. 11
        const current_time = new Date(2024, 3, 17, 9, 51, 0);
        console.log(current_time);

        console.log(`현재 연도: ${current_time.getFullYear()}`);
        console.log(`현재 월: ${current_time.getMonth()}`);
        console.log(`현재 일: ${current_time.getDate()}`);
        console.log(`현재 시간: ${current_time.getHours()}`);
        console.log(`현재 분: ${current_time.getMinutes()}`);
        console.log(`현재 초: ${current_time.getSeconds()}`);
    </script>
</body>
</html>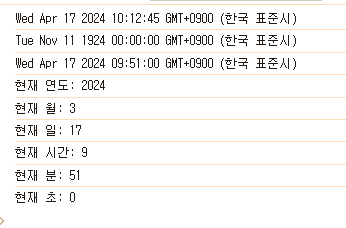
폼(form) 객체
- 일반적인 폼 요소에 접근할 때 사용
- document.forms 컬렉션을 이용해서도 접근이 가능
<form name='myform' id='regform' method='post' action='/regist'>
아이디: <input type='text' name='userid' id='userid'><br>
비밀번호: <input type='password' name='userpw' id='userpw'><br>
</form>
폼 접근하기
const frm = document.myform; // name
const frm = document.forms['myform']; // name
const frm = document.forms[0]; // 폼 중에서 첫번째 폼
const frm = document.getElementById('regform'); // id
아이디 입력상자에 접근하기
const userid = frm.userid; // name
const userid = document.forms['myform'].elements['userid']; // name
const userid = document.forms[0].elements[0];
const userid = document.forms[0][0];
const userid = document.getElementById('userid'); // id
<!DOCTYPE html>
<html lang="en">
<head>
    <meta charset="UTF-8">
    <meta name="viewport" content="width=device-width, initial-scale=1.0">
    <title>폼 객체</title>
</head>
<body>
    <h2>폼 객체</h2>
    <form action="/regist" name="frm1" id="frm1">
        <input type="text" name="userid" id="userid" placeholder="아이디를 입력하세요"><br>
        <input type="password" name="userpw" id="userpw" placeholder="비밀번호를 입력하세요">
    </form>

    <form action="/search" name="frm2" id="frm2">
        <input type="search" name="search" id="search" placeholder="검색어를 입력하세요"> <button type="button" onclick="sendit()">확인</button>
    </form>

    <script>
        const frm1 = document.frm1;
        console.log(frm1);
        console.log(frm1.userid.placeholder);
        document.getElementById('userid').value = 'apple';
        document.forms['frm1'].elements['userpw'].value = '1004';


        const frm2 = document.frm2;
        // frm2의 search에 있는 placeholder를 콘솔에 출력
        console.log(frm2.search.placeholder);
        // frm2의 search를 forms 컬렉션의 인덱스로 찾아 search 요소에 '코리아IT아카데미'를 입력
        frm2.search.value ='코리아IT아카데미';

        function sendit(){
            alert('확인을 눌렀어요!');
        }
    </script>
</body>
</html>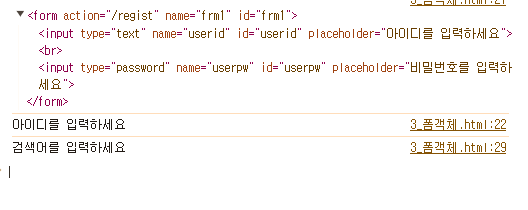
window 객체
웹 브라우저의 창이나 탭을 설정하기 위한 객체들이며, 웹 브라우저는 window 객체를 이용하여 브라우저 창을 표현할 수 있음. 모든 내장객체의 최상위 객체
window.alert()
window.confirm()
window.prompt()
setTimeout()
일정 시간이 지난 후 매개변수로 제공된 함수를 실행
const 변수명 = function(){
...
}
const st = setTimeout(변수명, 밀리초);
clearTimeout()
일정 시간 후에 일어날 setTimeout()을 취소함
<!DOCTYPE html>
<html lang="en">
<head>
    <meta charset="UTF-8">
    <meta name="viewport" content="width=device-width, initial-scale=1.0">
    <title>setTimeout</title>
</head>
<body>
    <h2>setTimeout</h2>
    <script>
        const hello = function(){
            alert('안녕하세요. JavaScript!');
        }

        const st = setTimeout(hello, 5000); // 5초
        clearTimeout(st);
    </script>
</body>
</html>
setInterval()
일정 시간마다 매개변수로 제공된 함수를 실행
clearInterval()
일정 시간마다 일어날 setInterval()을 취소함
<!DOCTYPE html>
<html lang="en">
<head>
    <meta charset="UTF-8">
    <meta name="viewport" content="width=device-width, initial-scale=1.0">
    <title>setInterval</title>
</head>
<body>
    <h2>setInterval</h2>
    <script>
        const hello = function(){
            console.log('안녕하세요. JavaScript!');
        }

        const si = setInterval(hello, 3000);

        const clearInter = function(){
            clearInterval(si);
            console.log('hello()가 중지되었습니다');
        }
    </script>
    <p><button onclick="clearInter()">중지</button></p>
</body>
</html>
문제.
현재 시간을 출력하는 문서를 만들어보자.
(단, 시작 버튼을 누르면 콘솔에 현재 시간을 초마다 출력하고, 중지 버튼을 누르면 시간이 정지됨. 다시 시작 버튼을 누르면 시간이 다시 출력되기 시작)
[시작] [중지]
콘솔
2024-04-17 11:16:00
2024-04-17 11:16:01
2024-04-17 11:16:02
2024-04-17 11:16:03
...
<!DOCTYPE html>
<html lang="en">
<head>
    <meta charset="UTF-8">
    <meta name="viewport" content="width=device-width, initial-scale=1.0">
    <title>시계 만들기</title>
</head>
<body>
    <h2>시계 만들기</h2>
    <script>
        function makeClick(){
            const date = new Date();
            yy = date.getFullYear();
            MM = date.getMonth() + 1;
            dd = date.getDate();
            hh = date.getHours();
            mm = date.getMinutes();
            ss = date.getSeconds();
            console.log(`${yy}-${MM}-${dd} ${hh}:${mm}:${ss}`);
        }

        let si;

        function startClock(){
            si = setInterval(makeClock, 1000);
        }

        function stopClock(){
            clearInterval(si);
            console.log('종료!');
        }

    </script>
    <button onclick="startClock()">시작</button>
    <button onclick="stopClock()">중지</button>
</body>
</html>

location 객체
현재 브라우저에 표시된 HTML 문서의 주소를 얻거나, 브라우저에 새 문서를 불러올 때 사용
https://koreaisacademy.com/community/tv_view.asp?idxnum=198&clkMater=&txtMenu=&txtCurPage=1&selMater=&gubun=1
URL
https://koreaisacademy.com/community/tv_view.asp
Protocol: 콜론을 포함하는 http, https, ftp 등 프로토콜 정보를 반환
예) https://
hostname : 호스트의 이름과 포트번호를 반환
예) https://koreaisacademy.com
pathname : URL 경로부분을 반환
예) /community/tv_view.asp
href: 페이지 URL 전체 정보를 반환 또는 URL을 지정하여 페이지를 이동시킴
reload(): 새로고침
<!DOCTYPE html>
<html lang="en">
<head>
    <meta charset="UTF-8">
    <meta name="viewport" content="width=device-width, initial-scale=1.0">
    <title>location 객체</title>
</head>
<body>
    <h2>location 객체</h2>
    <script>
        function pageInfo(){
            console.log(`현재 문서의 URL주소: ${location.href}`);
            console.log(`현재 문서의 protocol: ${location.protocol}`);
            console.log(`현재 문서의 hostname: ${location.hostname}`);
            console.log(`현재 문서의 pathname: ${location.pathname}`);
        }

        function sendit(){
            location.href = 'https://python.org';
        }
    </script>
    <p><button onclick="pageInfo()">페이지 정보</button>
        <button onclick="sendit()">이동하기</button>
        <button onclick="location.reload()">새로고침</button>
    </p>
</body>
</html>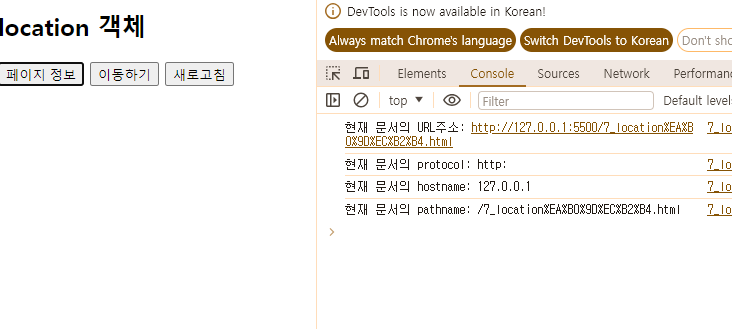
history 객체
- 브라우저의 히스토리 정보를 문서와 문서상태 목록으로 저장하는 객체
- 사용자의 개인 정보를 보호하기 위해 이 객체의 대부분의 기능을 제한
back(): 페이지를 뒤로 이동시킴
forward(): 페이지를 앞으로 이동시킴
go(0): 새로고침, location.reload()와 같은 기능
<!DOCTYPE html>
<html lang="en">
<head>
    <meta charset="UTF-8">
    <meta name="viewport" content="width=device-width, initial-scale=1.0">
    <title>history 객체</title>
</head>
<body>
    <h2>history 객체</h2>
    <button onclick="history.back()">뒤로</button>
    <button onclick="history.forward()">앞으로</button>
    <button onclick="history.go(0)">새로고침</button>
</body>
</html>
navigator 객체
브라우저 공급자 및 버전 정보 등을 포함한 브라우저에 대한 정보를 저장하는 객체
geolocation : GPS정보를 수신하는 프로퍼티
<!DOCTYPE html>
<html lang="en">
<head>
    <meta charset="UTF-8">
    <meta name="viewport" content="width=device-width, initial-scale=1.0">
    <title>navigator</title>
</head>
<body>
    <h2>navigator</h2>
    <script>
        const success = function(loc){
            console.log(loc.coords.latitude);
            console.log(loc.coords.longitude);
        }
        const fail = function(msg){
            console.log(msg.code);
        }

        navigator.geolocation.getCurrentPosition(success, fail)
    </script>
</body>
</html>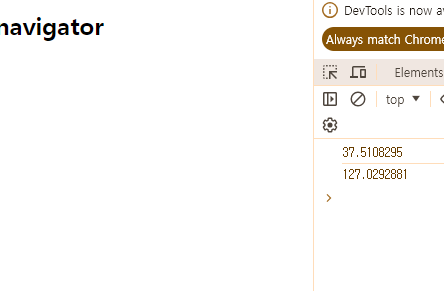
document 객체
- DOM(Document Object Model)
- HTML문서 또는 XML문서 등을 접근하기 위한 일종의 인터페이스 역할
- 문서내의 모든 요소를 정의하고 각각의 요소에 접근하는 방법을 제공
- 웹 페이지 자체(Body)를 의미하는 객체
- 웹 페이지에 존재하는 HTML 요소에 접근하고자 할 때 반드시 document 객체로부터 시작
getElementById(): 해당 아이디의 요소를 선택
getElementsByTagName(): 해당 태그 이름의 요소를 모두 선택
getElementsByClassName(): 해당 클래스에 속한 요소를 모두 선택
getElementsByName(): 해당 name 속성값을 가지는 요소를 모두 선택
querySelectorAll(): 선택자로 선택되는 요소를 모두 선택
querySelector(): 선택자로 선택되는 요소를 선택
노드(node)
HTML DOM은 노드라고 불리는 계층적 단위에 정보를 저장
노드 종류
문서 노드: 문서 전체를 나타내는 노드
요소 노드: HTML 모든 요소는 요소노드이며, 속성노드를 가질 수 있음
속성 노드: HTML 모든 요소는 속성노드이며, 속성노드에 관한 정보를 가지고 있음
텍스트 노드: HTML 모든 텍스트는 텍스트노드
주석 노드: HTML 모든 주석은 주석노드
노드의 관계
parentNode: 부모 노드
children: 자식 노드
childNodes: 자식 노드 리스트
firstChild: 첫번째 자식 노드
firstElementChild: 첫번째 자식 요소 노드
lastChild: 마지막 자식 노드
nextSibling: 다음 형제 노드
previousSibling: 이전 형제 노드
<!DOCTYPE html>
<html lang="en">
<head>
    <meta charset="UTF-8">
    <meta name="viewport" content="width=device-width, initial-scale=1.0">
    <title>문서 객체 모델1</title>
</head>
<body>
    <h2>문서 객체 모델1</h2>
    <ul>
        <li name="markup">HTML</li>
        <li>CSS</li>
        <li id="javascript" clas="js">JavaScript</li>
        <li class="js">React</li>
        <li class="backend">Apache</li>
        <li class="backend">NgineX</li>
        <li id="nodejs" class="js">Node.js</li>
        <li id="vue" class="js">Vue</li>
    </ul>
    <script>
        const tagName = document.getElementsByTagName('li');
        for(let i=0; i<tagName.length; i++){
            console.log(tagName[i]);
            tagName[i].style.color = 'gold';
        }

        console.log('--------------');

        const className = document.getElementsByClassName('js');
        for(let i=0; i<className.length; i++){
            console.log(className[i]);
            className[i].style.color = 'deeppink';
        }

        console.log('---------------');

        const id = document.getElementById('javascript');
        console.log(id);
        id.style.color = 'greenyellow';

        console.log('---------------');

        const name = document.getElementsByName('markup');
        for(let i=0; i<name.length; i++){
            console.log(name[i]);
            name[i].style.color = 'deepskyblue';
        }

        console.log('---------------');

        const qsa = document.querySelectorAll('li.backend');
        for(let i=0; i<qsa.length; i++){
            console.log(qsa[i]);
            qsa[i].style.color = 'navy';
        }
    </script>
</body>
</html>
<!DOCTYPE html>
<html lang="en">
<head>
<meta charset="UTF-8">
<meta name="viewport" content="width=device-width, initial-scale=1.0">
<title>문서 객체 모델2</title>
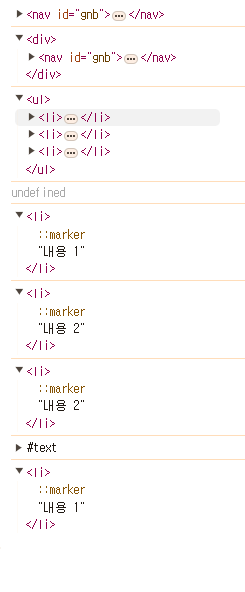
<script>
window.onload = function(){
const gnb = document.getElementById('gnb');
console.log(gnb);
console.log(gnb.parentNode);
console.log(gnb.children[0]);
console.log(gnb.children[1]);
console.log(gnb.children[0].children[0]);
console.log(gnb.children[0].children[1]);
console.log(gnb.children[0].children[0].nextElementSibling);
console.log(gnb.children[0].firstChild);
console.log(gnb.children[0].firstElementChild);
}
</script>
</head>
<body>
<h2>문서 객체 모델2</h2>
<div>
<nav id="gnb">
<ul>
<li>내용 1</li>
<li>내용 2</li>
<li>내용 3</li>
</ul>
</nav>
</div>
</body>
</html>
<!DOCTYPE html>
<html lang="en">
<head>
    <meta charset="UTF-8">
    <meta name="viewport" content="width=device-width, initial-scale=1.0">
    <title>노드 메서드</title>
    <script>
        function appendNode(){
              const parent = document.getElementById('list');
              console.log(parent);
              const newItem = document.getElementById('item1');
              console.log(newItem);
                // appendChild(): 새로운 노드를 해당 노드의 자식 노드 리스트 맨 마지막에 추가
               parent.appendChild(newItem);
            }

        function insertNode() {
                const parent = document.getElementById('list');
                const backend = document.getElementById('backend');
                const newItem = document.getElementById('item2');
                parent.insertBefore(newItem, backend);
            }

        function appendText(){
                const text = document.getElementById('text').firstChild;
                console.log(text);
                text.insertData(7, '아주 피곤한 수요일 ');
            }
        function createNode(){
            const newItem = document.getElementById('item1');
            // createElement(): 새로운 요소 노드를 만듦
            const newNode = document.createElement('p');  //<p></p>

            // <p><strong>😎 새로운 요소가 추가됨!</strong></p>
            // innerHTML : HTML요소와 텍스트를 삽입
            // innerText : 텍스트만 삽입
            newNode.innerHTML = '<strong>😎 새로운 요소가 추가됨!</strong>'
            document.body.insertBefore(newNode, newItem);
        }

        function createAttr(){
            const newItem = document.getElementById('item2');
            // createAttribute(): 새로운 속성 노드를 만듦
            const newAttr = document.createAttribute('style'); // style= ''

            // style= 'color:deeppink; background-color:gold;';
            newAttr.value = 'color:deeppink; background-color:gold;';
            // <p id="item2" style='color:deeppink; background-color:gold;'>React</p>
            newItem.setAttributeNode(newAttr);
        }

        function createText(){
            const textNode = document.getElementById('ct');
            // createTextNode(): 새로운 텍스트 노드를 만듦
            const newText = document.createTextNode('😎😊🤣😁😍😒😘');
            textNode.appendChild(newText);
        }

        function removeNode(){
            const parent = document.getElementById('list');
            const removeItem = document.getElementById('backend');
            // removeChild(): 자식 노드 리스트에서 특정 자식 노드를 제거, 노드가 제거되면 해당 노드를 반환, 노드가 제거될 대 노드의 자식들도 다같이 제거
            const result = parent.removeChild(removeItem);
            console.log(result);
        }
        function removeAttr(){
            const newItem = document.getElementById('item2');
            // removeAttrribute(): 특정 속성 노드를 제거
            newItem.removeAttribute('style');

        }
        function cloneElement(){
            const parent = document.getElementById('list');
            const originItem = document.getElementById('cl');
            // cloneNode(): 기존의 존재하는 노드와 동일한 새로운 노드를 생성하여 반환(true 자식까지 복사, false 자식은 복사하지 않음)
            parent.appendChild(originItem.cloneNode(true));

        }
        </script>
    </head>
    <body>
        <h2>노드 메서드</h2>
        <script>

        </script>

        <h2 id="cl">노드</h2>
        <div id="list">
            <p id="backend">node.js</p>
            <p>HTML</p>
            <p>CSS</p>
        </div>
        <p id="item2">React</p>
        <p id="item1">JavaScript</p>
        <hr>
        <p id="text">현재 시간은 오후 3시</p>
        <button onclick="appendNode()">노드추가1</button>
        <button onclick="insertNode()">노드추가2</button>
        <button onclick="appendText()">텍스트노드추가2</button>
        <hr>
        <p id="ct"></p>
        <hr>
        <button onclick="createNode()">노드생성</button>
        <button onclick="createAttr()">속성노드생성</button>
        <button onclick="createText()">텍스트노드생성</button>
        <hr>
        <button onclick="removeNode()">노드삭제</button>
        <button onclick="removeAttr()">속성노드삭제</button>
        <hr>
        <button onclick="cloneElement()">노드복제</button>
    </body>
    </html>
</body>
</html>
'코딩 > 자바스크립트' 카테고리의 다른 글
| 자바스크립트, 5일차 (0) | 2024.04.19 |
|---|---|
| 자바스크립트, 4일차 (1) | 2024.04.18 |
| 자바스크립트, 2일차 (0) | 2024.04.16 |
| 자바스크립트, 1일차 (0) | 2024.04.15 |
| [JavaScript] 문자열에서 특정 문자의 개수를 세는 예 (0) | 2022.06.13 |


